|
|
|
Who's Online
There currently are 6016 guests online. |
|
Categories
|
|
Information
|
|
Featured Product
|
|
|
 |
|
|
There are currently no product reviews.
 ;
Excellent printing quality.
A complete and very usefull service manual with all details.
GREAT SERVICE AT VERY LOW PRICE!
A+++++++++++++++++++++++++
;
Pioneer CDXP23S is an old model and has been top useful for me to find this Manual. CD Player is still repaired.
;
Inventory (Stock): a rather extensive list of service manuals, which are hard to find, especially 15+ yrs old.
Pricing: very reasonable.
Delivery/Response: Very Prompt delivery of product: Placed order and received download access within 1.5hrs.
Service Manual: a rather complete OEM service manual (15.5MB pdf file size). Scan quality was very good, accept for a few circuit board diagrams that were dark; Zooming, however, clarified the image. Has the required information for servicing the LD Player.
;
Perfect copy of a necessary document and my Sonic Modulator is repaired!
;
Excellent replacement for original Manual. Worth every cent ! I am totally satisfied!
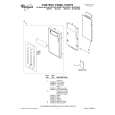
Tray (3)
� After inserting the tray (3), confirm that the mark of the gear (4) matches with that of the rack gear on the tray (first tooth of the gear). (Refer to Fig. B.)
B Gear (4) Tray panel (4) A
Figure A Triangle mark
Tray (3)
Claws
Tray panel (4)
Position of the line Pickup mechanism assembly Gear (4) The first tooth of the gear of this side on the tray rack gear.
Fig. 2-1-5 1-1-4. Front Panel and Tray 1. Remove the flexible cable (1). 2. Release four claws and remove the front panel (2). 3. Pull out the tray (3) to this side.
Rack gear Gear (4) Slider Tray (3)
Claw Tray (3) Marking Figure B
Fig. 2-1-7 1-1-5. Rear Panel 1. Remove three screws (1) and remove the rear panel (2).
Flexible cable (1) Screw (1) Front panel (2) Claw
Claws
Fig. 2-1-6 Note: � Insert the tray (3) with the front side of the pickup mechanism assembly descended. (The slider positions to the left side.) � The gears are required to match their phases each other. After setting the gear (4) as shown in the figure �A�, insert the tray (3). When inserting a tray (3), push the rack gear side shown by the arrow.
Rear panel (2)
Fig. 2-1-8
2-3
|
|
|
> |
|